Home Office Setup Guide: Must-Have Essentials and Ideas

You don’t need a big budget or a spare room to set up a functional home office. After five years of working from home—and testing 12+ different desk configurations, three chairs, and two complete workspace overhauls—I’ve learned that thoughtful planning beats expensive furniture every time.
My first setup cost $1,800 but left me with chronic neck pain within three months because I positioned my monitor incorrectly and bought a chair based on aesthetics.
A setup that fits your needs keeps your back comfortable, reduces distractions, and makes working from home enjoyable.
In this home office setup guide, I’ll walk you through how to build a workspace that looks good and helps you get more done.
Quick Takeaways
- Work type and daily tasks determine space and equipment requirements
- Ergonomics prevents costly health issues (musculoskeletal disorders cost over $50 billion annually.)
- Layout planning maximises efficiency in any space size
- Strategic lighting reduces eye strain and improves focus by up to 33%
- Budget setups starting at $200 can be just as functional as premium configurations
What Is a Home Office Setup?
A home office setup is the physical and technical arrangement of furniture, equipment, and tools that enables you to work productively from your residence.
It includes your desk, chair, computer, lighting, storage, and any job-specific gear arranged to support your workflow.
The setup is designed to replicate or enhance the functionality of a traditional office while accounting for the constraints of residential space.
A functional home office setup prioritizes ergonomics, minimizes physical strain, and keeps essential tools accessible during work hours.
How to Set Up a Home Office (Foundational Framework)
Before you buy any furniture, figure out precisely what you need based on how you work.
A lot of people drop thousands on standing desks, ergonomic chairs, or other gear just because they saw someone else using them, not because it actually solves their problem.
I’ve seen remote workers buy $1,500 worth of equipment in their first month—a standing desk, a mesh chair, dual monitors, wireless everything—only to realize they spend 60% of their day on video calls and the real issue was poor webcam angle and lighting.
A friend spent $1,400 on furniture before addressing the $80 ring light and $40 laptop stand that actually fixed her on-camera presence.
The expensive desk sat unused in standing mode because she couldn’t type comfortably during back-to-back calls.
You want to figure out your real requirements before you spend any cash on what you don’t need, or waste time building an office that doesn’t fit your needs just because you saw some inspo on Pinterest.
You’ll save money and avoid frustration with tools that don’t actually improve your setup.
How Do I Determine My Work Type and Equipment Needs?
Your work determines what your setup should look like. If you mostly handle email and get on occasional video calls, you don’t need the same gear as a video editor cranking out 4K footage all day.
- Remote work: If you work remotely, you spend long hours typing, joining calls, and sitting at your desk. Make sure you have reliable internet, a solid webcam, and a supportive chair. Pay attention to your posture—skipping ergonomics will lead to discomfort and long-term strain.
- Content creation: As a content creator, your desk turns into a mini production studio. You need space for cameras, microphones, audio interfaces, and multiple monitors. Sound matters too—hard surfaces reflect audio and create echoes that make editing a headache.
- Designers and power users: Running design software, virtual machines, or multiple apps at once pushes your computer hard. You need a machine that can handle heavy workloads without slowing down. These demands also affect your budget and cooling setup, as intense use generates heat that your workspace must manage efficiently.
How Much Space Do I Need to Set Up a Home Office?
Minimum Space Requirements by Work Type:
|
Work Type |
Square Footage |
Desk Size |
Key Considerations |
|
Freelance Writer |
6-8 sq ft (3×3 ft corner) |
40-48″ wide, 24″ deep |
Minimal equipment; closet conversions work |
|
Customer Service |
8-12 sq ft (3×4 ft area) |
48″ wide, 24″ deep |
Room for notes, drink, headset storage |
|
Video Editor |
15-20 sq ft (4×5 ft area) |
60-72″ wide, 30″ deep |
External drives, dual monitors, speakers |
|
Content Creator |
20-30 sq ft (5×6 ft zone) |
L-shaped or 72″+ |
Lighting stands, cameras, staging area |
- Video editor: If you’re a video editor, you need enough room for external hard drives, backup systems, and sometimes a dedicated rendering machine. That means a larger desk and organized storage to keep everything running smoothly. Plan for at least 15-20 square feet of workspace (roughly a 4×5 ft area) to accommodate a 60-72 inch desk, equipment rack or shelf unit, and chair clearance. If you use dual monitors plus reference speakers, you’ll need a desk depth of at least 30 inches.
- Freelance writer: If you’re a freelance writer, your setup can stay much simpler. Writing work needs very little equipment, and a smaller, uncluttered workspace often helps you focus better. A compact 6-8 square feet (as small as a 3×3 ft corner) works well with a 40-48 inch desk and minimal storage. You can function effectively in spaces as tight as a closet conversion or bedroom corner.
- Customer service: Customer service roles typically fall in the middle, with basic needs such as a laptop, a headset, and reliable internet. Expect to use 8-12 square feet (roughly 3×4 ft) for a basic desk setup with room for note-taking materials and a drink. A standard 48-inch desk with a 24-inch depth comfortably handles most customer service workflows.
- Creator: Creator and production-heavy work takes up the most space. When you try to squeeze that kind of setup into a tight corner, managing the equipment becomes more complicated, and your workflow suffers. Budget 20-30 square feet minimum (a 5×6 ft zone or larger) to accommodate recording equipment, lighting stands, camera positioning space, and editing workstation. L-shaped or corner desks work best, providing 10-12 feet of combined surface area for gear staging and active work zones.
Knowing what your role requires daily helps you design a home office that supports your work rather than getting in the way.
How Do I Assess My Available Space for a Home Office?
Most people don’t have the luxury of a dedicated office. Still, productive setups can work in bedrooms, living room corners, closets, and even hallways once you understand what you’re working with.
Room Types and Their Trade-offs
Where you set up your workspace has a real impact on your focus, comfort, and long-term health, and every room comes with its own trade-offs.
If you work from a bedroom, you get privacy, but it can make it harder to switch off mentally once the workday ends.
A living room typically offers better natural light and airflow, but because it’s a shared space, interruptions and background noise are more likely.
Basements tend to be quieter and more isolated, which helps with focus, but relying on artificial lighting for long hours can disrupt your sleep rhythm if you don’t manage it carefully.
Research shows that lack of natural light exposure during daytime work hours can shift circadian rhythms, making it harder to fall asleep at night and reducing overall sleep quality.
Natural light exposure during the day helps regulate melatonin production—the hormone that signals your body when to sleep.
When you work in spaces with only artificial lighting, especially cool-toned LED bulbs (5000K+), your body doesn’t receive the proper light cues throughout the day, which can delay your natural sleep onset by 30-60 minutes and reduce sleep quality.
Shared Versus Dedicated Spaces
Shared and dedicated workspaces require very different things from you, which directly affects how you set up your home office.
If your workspace shares a room with a bedroom, dining area, or guest room, you need flexibility because the space must still work for daily life.
Furniture that folds away or serves multiple purposes helps you keep work contained rather than letting it spill into everything else.
Wall-mounted desks, Murphy desk systems, and compact storage make it much easier to switch between work and personal time.
A dedicated workspace makes things simpler. You can spread out, leave your equipment set up, and stop wasting time resetting your space every day.
That consistency helps your workflow run more smoothly and efficiently, especially if you use multiple tools or devices that you want within easy reach.
Power, Ventilation, and Natural Light Requirements
Power, ventilation, and natural light seem basic, but they have a significant impact on how comfortable and focused you feel while working. Before you buy any equipment, review your power setup.
Monitors, external drives, chargers, and desk lamps add up fast, so most setups need at least four outlets. If you run creator gear or heavier equipment, you may need more.
A typical desk setup usually includes a laptop charger, a monitor, a desk lamp, and a phone charger. That’s four outlets with zero room for external drives, speakers, or equipment expansion.
I’ve seen people daisy-chain power strips or run extension cords across rooms because they underestimated their outlet needs by just two or three devices. Plan for 6-8 outlets if you have any equipment beyond a basic laptop setup.
Ventilation matters just as much, especially in smaller rooms. Your computer and your body generate heat, and when the door remains closed, that heat has nowhere to go.
Placing your desk near a window helps; if that is not an option, a small fan can make the space feel more comfortable.
Natural light also plays a significant role in how you feel during the day. It helps with focus, reduces eye strain, and supports your mood over long work sessions.
If your space receives little daylight, you will need adequate artificial lighting to maintain a comfortable workspace.
What Are the Core Principles for Setting Up a Home Office?
Four principles guide every decision you make: ergonomics first, workflow efficiency, comfort over aesthetics, and scalability.
Ergonomics First
Ergonomics should come first because it protects your long-term health. Poor equipment and posture cause significant problems like back pain, which affects 41% of home office workers, and musculoskeletal disorders account for 34% of lost work time, costing employers over $50 billion annually in workers’ compensation claims.
Even at home, your body responds to bad posture the same way it does in the office, so setting up your workspace properly is essential to prevent pain and long-term injuries.
Workflow Efficiency
To maximize workflow efficiency, keep your most-used tools within arm’s reach. If you don’t, constantly getting up for supplies, twisting for your mouse, or searching through drawers wastes time and strains your body.
To address these inefficiencies, arrange your workspace so tasks flow naturally from one step to the next, minimizing unnecessary movements and making work feel effortless.
Comfort Over Aesthetics
Comfort over aesthetics is difficult for many people to accept. That mid-century modern chair with the angled wooden back and tapered legs looks incredible on Instagram, but if it doesn’t have lumbar support and adjustable height, it’ll wreck your back.
The same goes for minimalist mesh stools marketed as “active sitting” solutions and industrial metal chairs with rigid backs—they photograph beautifully but offer zero ergonomic adjustability.
You want to prioritize function when selecting office furniture, so look for pieces that also align with your aesthetic preferences.
Scalability
Think about scalability when setting up your workspace. You might only need one monitor now, but will you want a second in six months? Will a microphone fit if you start recording? Pick furniture and layouts that can grow with you, so you don’t have to redo everything as your needs change.
Home Office Layout Planning
Layout determines whether your space works with you or against you. I’ve seen people with premium equipment struggle because they arranged everything backwards.
What Are the Best Home Office Layout Types?
Four primary layouts solve different space and workflow challenges. Your choice depends on available area, work style, and equipment needs.
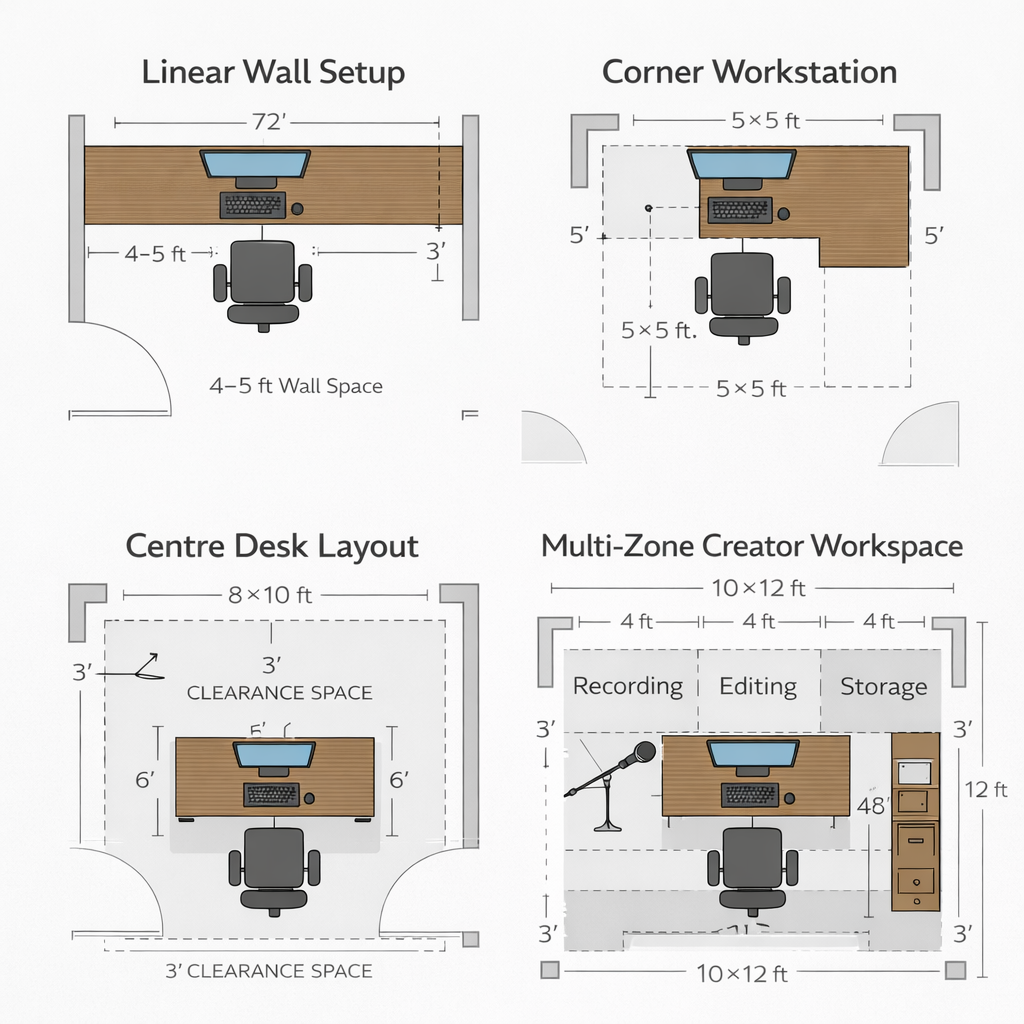
Linear wall setup
A linear wall setup puts your desk against a single wall, which works excellently in narrow spaces like hallways or bedrooms.
You keep your monitor, keyboard, and supplies right in front of you, so everything stays within reach.
The downside is the limited surface area, which makes it hard to spread out documents or add extra equipment.
This setup works best for basic computer tasks, video calls, or writing. You’ll need at least four to five feet of wall space.
It takes up minimal space and keeps cables tidy, but it can feel cramped when using multiple monitors or additional tools.
Corner workstation
Set up your corner workstation in an L-shape to get more surface area while keeping the centre of the room open.
Use one side for your computer work and the other for paperwork, equipment, or creative projects.
This setup works best if you juggle multiple tasks or need space for gear. Make sure the corner is at least 5 feet by 5 feet.
You’ll get plenty of room and natural separation for your tasks, but keep in mind that a corner can block natural light, so try to place it near a window if you can.
Centre Desk Layout
If you place your desk in the middle of the room, it instantly gives your space a professional, executive vibe.
You’ll need plenty of room to walk around all sides, so aim for at least 8×10 feet. This setup works best if you meet clients, run an executive-style office, or have a dedicated workspace.
You get a strong professional presence, easy access from every angle, and space for meetings. The trade-off is that it occupies significant space and complicates cable management.
Multi-zone creator workspace
If you set up a multi-zone creator workspace, you divide your room into distinct areas for each task: recording, editing, and gear storage.
In the recording spot, you’ll have proper lighting and acoustic treatment so your audio and video come out clean.
Your editing zone gets multiple monitors and reference speakers to make production smoother, while the storage area keeps everything within reach but out of the way.
This layout works best for content creators, podcasters, and video producers. You’ll get studio-level quality and a workflow that actually makes sense, but it does take up space and needs careful cable management.
|
Layout Type |
Space Required |
Best Use Case |
Key Advantage |
Main Limitation |
|
Linear Wall |
4-5 ft wall |
Basic computer work |
Minimal footprint |
No expansion room |
|
Corner Workstation |
5×5 ft corner |
Multi-tasking, creators |
Maximum surface area |
Limited light access |
|
Centre-Desk |
8×10 ft room |
Client meetings, executives |
Professional appearance |
Massive space requirement |
|
Multi-Zone Creator |
10×12 ft room |
Content production |
Production-quality workflow |
Complex setup |
RELATED: 11 Small Home Office Layout Ideas and Tips that Make Working from Home Enjoyable
How Should I Position My Desk for Optimal Ergonomics?
Monitor Alignment
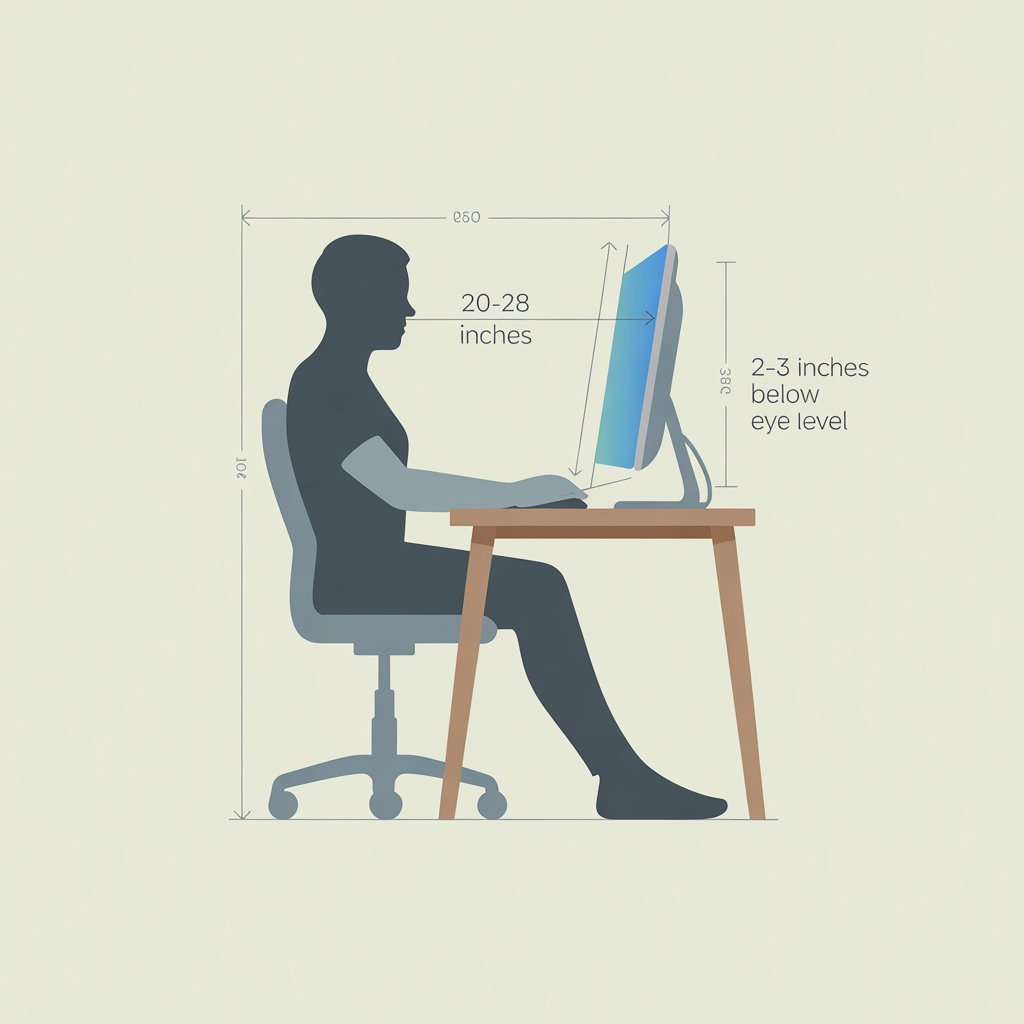
How you align your monitor can make the difference between maintaining an ergonomic posture and developing neck strain.
Place your primary monitor directly in front of your chair at arm’s length, about 20 to 28 inches away, with the top of the screen sitting 2 to 3 inches below eye level.
If you use dual monitors, angle them inward by 15 to 20 degrees to reduce frequent neck twisting and maintain a comfortable posture throughout the day.
Chair Clearance
Make sure your chair has enough clearance so you can move freely without bumping into walls or furniture. For standard chairs, leave at least 36 inches behind, and for rolling office chairs, provide 42 inches to push back and stand comfortably.
Cable Routing
Before you set up your equipment, figure out where all your cables will go so nothing looks messy or becomes a trip hazard.
Run them along the walls with clips, tuck them under your desk with trays, and thread any through grommets to keep your workspace clear. Set the paths so you can move your gear without getting tangled up.
Under-desk cable trays like the Ikea Signum or wire baskets from Amazon Basics can help keep power strips and excess cable length hidden.
For vertical runs along walls or desk legs, adhesive cable clips or J-channel raceways prevent sagging and tangling, especially critical if you use a height-adjustable desk where cables need slack to move with the surface.
How Can I Optimize a Small Space for My Home Office?
If you have a small space, here’s how you can optimize it for your home office:
Vertical Storage
You can use vertical storage to maximise a small space. Install floating shelves above your desk for books, supplies, or decorative items.
Hang a pegboard on the wall to keep headphones, cables, and tools within easy reach. Tall, narrow bookcases help you use height rather than additional floor space.
Foldable Furniture
You can set up your workspace to adapt to different tasks throughout the day by using foldable furniture. Fold down a wall-mounted drop-leaf desk when you need it, then tuck it away to free up the room.
Stack folding chairs in a closet and pull out nesting tables only when you need extra surface space; put them back when you’re done.
Minimalist Zoning
Minimalist zoning creates boundaries in shared spaces without permanent dividers. Use area rugs to define your work zone visually.
Position furniture (like a bookshelf or filing cabinet) as a subtle room divider that doesn’t block light.
Even in a 70-square-foot space (roughly twice the size of a queen bed), you can fit a functional desk, chair, and compact storage.
What Furniture Do I Need for a Home Office?
Furniture directly affects your daily comfort. The quality of your chair and desk becomes apparent after an eight-hour workday, as it shows up in how your body feels by the end of the day.
What Should I Look for in a Home Office Chair?
With 41% of home workers reporting new or worsening back and shoulder pain after transitioning to remote work, many studies show improper seating accounts for 60-70% of these complaints, and the office chair is usually the culprit.
Ergonomic Principles
Ergonomic principles are grounded in applied biomechanics, not marketing hype. A proper home office chair supports your spine’s natural S-curve. As you sit, your lower back naturally curves inward, a position called lumbar lordosis.
Without adequate lumbar support, the spine bends unnaturally, compressing discs and straining ligaments, which can lead to chronic pain over time.
Lumbar Support
Look for lumbar support that adjusts in both height and depth, as no two spines align the same way.
Your lower back curve varies with your torso length, so you want the support to sit squarely on your lower back, not creep up into your mid-back or drop too low near your hips.
Essential Adjustable Features
Adjustability is what makes a chair truly ergonomic, not just something that looks good in an office. At the very least, you want to adjust the seat height so your feet stay flat on the floor and your knees sit at about a right angle.
Adjustable armrests help keep your shoulders relaxed, and a slightly tilting backrest takes pressure off your lower back.
If you upgrade to a higher-end chair, you also get features such as seat depth adjustment, armrest width adjustment, and tension control, which let you fine-tune the chair to your body and stay comfortable for longer stretches.
Common Chair Setup Mistakes to Avoid
Even a good chair can cause problems if it is set up improperly. When the seat is set too high, it puts pressure on your thighs; when it is too low, your feet hang, restricting circulation.
Armrests need attention, too. Set them too high and your shoulders stay tense all day. Set them too low, and you end up leaning forward without realizing it.
On top of that, you still need to move. No chair can protect your body if you stay frozen in the same position for hours.
RELATED: Modern Home Office Furniture: Types, Storage, and Accessories
Should I Get a Standing Desk or an Adjustable Desk?
Standing desks are more than a trendy upgrade. When you can switch between sitting and standing, you give your body a break from staying in one position all day.
Research shows that people who use sit-stand desks often experience significantly less lower back discomfort, with studies from Texas A&M showing over 50% less pain than workers who sit all day.
The benefits are not just about your back. Changing positions helps blood flow, reduces stiffness in your legs, and eases the physical strain that builds up when you stay seated for too long. The real win comes from movement, not from standing all day.
Fit matters just as much as movement. Your desk needs to be adjusted to your height; otherwise, ergonomics will fall apart. If a desk is too low or too high for your body, you will still strain your shoulders and back.
A height range of about 24 to 25 inches on the low end and 48 to 50 inches on the high end works for most people.
When choosing between manual and electric desks, think about how often you will actually adjust them.
Manual desks cost less, but cranking them up and down takes effort, which makes most people stop using the feature.
Electric desks cost more, but a quick button press removes friction and makes it easy to change positions throughout the day.
How Do I Choose the Right Desk and Work Surface?
Desk depth and width play a significant role in how comfortable your setup feels. A desk should be at least 24 inches deep so you can place your monitor at a proper viewing distance of about 20 to 28 inches from your eyes.
If you use dual monitors, a depth of approximately 30 inches gives you more room to work without feeling cramped.
Desk width depends on how much equipment you use. A laptop-only setup works fine on a 40-inch desk, while multi-monitor or equipment-heavy setups usually need 60 inches or more to stay organized and comfortable.
Material Options: Durability, Aesthetics, and Cost
Desk materials affect how long the desk lasts, how it looks, and how much you spend. Here’s what to expect from each material type:
|
Material |
Price Range |
Expected Lifespan |
Common Failure Points |
|
Solid wood |
$500-$2,000 |
15-20+ years |
Surface scratches, water rings, and finish wear |
|
Engineered wood (MDF/particleboard) |
$150-$400 |
3-5 years |
Sagging under weight, edge chipping, moisture swelling |
|
Laminate |
$200-$500 |
5-8 years |
Corner delamination, edge peeling |
|
Metal & glass |
$300-$800 |
10-15 years (frame); 8-10 years (glass) |
Glass cracks, surface scratches on metal |
Solid wood desks look great and can last for decades, but they typically cost between $500 and $2,000.
Engineered wood options like MDF or particleboard with veneer cost less, usually $150 to $400, and work well if you are not constantly moving heavy equipment.
Laminate desktops are easy to clean and resist scratches, though they can look basic. Metal and glass desks usually fall between $300 and $800 and fit well in modern, minimalist spaces.
RELATED: Modern Home Office Furniture: Types, Storage, and Accessories
Creator-Specific Space Requirements
Creative work requires more desk space than standard office tasks. Video editors need room for audio interfaces, external drives, and reference monitors.
Podcasters need space for mic arms and shock mounts, while streamers often need lighting, cameras, and multiple computers.
A standard 48-inch desk fills up quickly in these setups. Most creators need at least 72 inches of desk space or an L-shaped configuration to keep everything accessible without crowding.
Desk Storage and Organisation Furniture
Storage helps keep your desk functional and clutter-free. Drawers make it easy to store frequently used items like pens, cables, and notebooks without covering your work surface. A desk with two or three drawers usually provides enough everyday storage.
File drawers still help when handling paperwork, even though many workflows are primarily digital.
Shallow drawers work best because they prevent items from getting buried. Shelving adds vertical storage for books, decor, and equipment.
Floating shelves above the desk keep reference items visible, while bookshelf units beside the desk hold files, boxes, or personal items. Adjustable shelving gives you flexibility as your needs change.
Mobile storage adds even more flexibility. Rolling file cabinets slide under the desk when not in use.
Drawer units on wheels move easily between workstations in shared spaces. Storage carts let you keep supplies close while working, then roll them out of the way when you are finished.
What Ergonomic Accessories Do I Actually Need?
Once you’ve got the basics set up, you can use accessories to make your workspace more comfortable and prevent strain. These aren’t luxury items—they’re tools that keep your body from wearing down over time.
Core Ergonomic Accessories
Monitor Arms
Monitor arms free up your desk and lets you place your screen exactly where you need it. A good one costs $60–$500 and adjusts height, tilt, swivel, and depth.
The Huanuo single monitor arm which costs from $65 and Amazon Basics monitor arm ranging from $100-120 are widely recommended for smooth adjustment and long-term durability—both use quality gas springs that maintain tension over years of daily use.
If you need dual-monitor support, the Ergotron LX vertical Dual or Vivo dual-monitor arms handle most standard monitors reliably. Cheaper arms that stick will require constant adjustment
Keyboard Trays
A keyboard tray lets you set your keyboard at the right height, keeping your elbows at 90 degrees and your shoulders relaxed.
If your desk is 29 inches high, a tray usually drops the surface to 26–27 inches. Tilt adjustment helps you keep your wrists neutral while typing.
Footrests
Even with an adjustable chair, your feet might not sit flat on the floor. A footrest lifts them to align your knees and take pressure off your thighs.
You can find one for $20–$50, and it makes a noticeable difference when you work for long stretches.
Wrist Supports
Wrist supports cushion your wrists and keep them neutral while typing. Gel-filled ones lose their support over time—if you press down and the gel doesn’t spring back quickly, or you can feel the hard desk surface through the padding, it’s time to replace it.
This typically happens after 10-14 months of daily use as the gel breaks down from constant compression. Swap them out each year to stay comfortable and avoid strain.
Memory foam wrist rests last longer (18-24 months) but cost slightly more while firmer foam supports maintain their shape for 2-3 years but provide less initial softness.
Ergonomics Checklist Summary
Neutral Posture Markers:
- Feet flat on the floor or footrest
- Knees bent at 90-100 degrees
- Hips slightly higher than knees
- Lower back supported by a lumbar cushion
- Shoulders relaxed, not hunched
- Elbows at 90 degrees, close to the body
- Wrists neutral (straight line from elbow to middle finger)
- Head balanced over shoulders, not jutting forward
Screen Height Rules:
- Top of screen 2-3 inches below eye level
- Monitor distance: arm’s length (20-28 inches)
- The screen is tilted 10-20 degrees backward
- No glare from windows or overhead lights
- Dual monitors angled inward 15-20 degrees
Seating Alignment:
- Seat depth leaves 2-4 inches between the seat edge and the back of the knees
- The backrest supports the lumbar curve at the correct height
- Armrests at a height that keeps shoulders relaxed
- Chair height allows feet to be flat with knees at 90 degrees
- Ability to sit fully back against the lumbar support while working
What Equipment and Technology Do I Need for My Home Office?
Your tech drives how much work you can get done. Slow computers frustrate you and drain motivation.
Essential Home Office Equipment
Pick a computer that matches your workload. A $400 laptop with 8 GB of RAM and an i3 processor handles emails and documents just fine.
If you’re doing design, video editing, or juggling multiple apps at once, go for 16 GB of RAM, a dedicated graphics card, and an i7 or M1 chip so your system keeps up with you.
Add external monitors to reduce neck strain and get more screen space. A 24–27-inch monitor costs $150–300 and offers far more screen real estate than a small laptop screen.
Keep it at arm’s length with the top just below your eyes. If you use two monitors, put the main one in front and angle the second at about 30 degrees.
Choose input devices that protect your wrists and arms. Split keyboards keep your wrists neutral, and vertical mice hold your forearm in a relaxed handshake position.
Wireless devices cut cable clutter, though you’ll need to manage the batteries. Investing $50–150 in quality peripherals can reduce discomfort and prevent long-term issues such as carpal tunnel.
What Equipment Do Content Creators Need in Their Home Office?
Cameras make a big difference in video quality for recordings and calls. Built-in laptop cameras work for basic Zoom meetings, but if you want professional-looking content, a dedicated webcam gives you crisp 1080p clarity for $100–200.
For higher-end production, mirrorless cameras with HDMI output deliver 4K video, though they cost $800–1,500 and require a capture card to connect to your computer.
Microphones are equally crucial for professional audio. USB condenser mics plug directly into your computer, cost $100–200, and provide good quality for solo creators.
XLR microphones deliver superior sound and more control, but you’ll need an audio interface to process the signal.
Dynamic microphones reject background noise better than condensers, which helps if you share your space.
Audio interfaces convert XLR signals into digital audio that your computer can handle. Entry-level models cost $100–$200, offer better preamps than USB microphones, and include features such as phantom power for condenser microphones, headphone monitoring, and sometimes instrument inputs.
Reliable options include the Focusrite Scarlett 2i2 ($180-200), which offers clean, transparent preamps with high gain range ideal for dynamic microphones like the Shure SM7B, and the SSL 2 ($230-250), which provides legacy SSL console-style preamps that add subtle warmth and character to vocal recordings.
The Scarlett is the safer choice for versatility; the SSL 2 is better if you want built-in tonal shaping.
Power, Connectivity, and Backup Systems
Plug in a good surge protector to keep your equipment safe from power spikes. A decent one costs $30–60, provides at least 1000 joules of protection, and often comes with equipment warranties.
Don’t be fooled by basic power strips—they might look nice, but they won’t protect your devices.
Keep a backup internet plan, so you stay online if your main connection drops. A mobile hotspot plan costs $20–40 a month, or you can use your phone’s hotspot in a pinch.
Add an uninterruptible power supply (UPS) to prevent losing work during outages.
It gives you 10–30 minutes of battery power to save your files and shut down safely, usually costing $100–200, depending on the capacity. If you have deadlines or unreliable electricity, a UPS is worth it.
How Should I Set Up Lighting in My Home Office?
Your home office lighting makes a huge difference in how well you focus and how comfortable you feel during long work sessions. Good lighting can boost your concentration by about a third compared to poor lighting.
Optimizing Natural Light
Set your desk perpendicular to windows so you get daylight without glare. Facing the window makes you squint, and having it behind you causes reflections on your screen.
Sheer curtains or blinds soften bright sunlight, and anti-glare filters or matte monitor screens further reduce reflections.
Layering Artificial Lighting
Use a desk lamp with an adjustable arm to light your work area—aim for about 500 lux, roughly what a 60-watt LED provides.
You have adequate lighting if you can read 10-point text comfortably without squinting or leaning closer to the page—that’s typically 400-500 lux.
If you need to strain to read normal-sized text, add more direct lighting.—and choose cooler colours around 4000–5000K to stay alert.
Add ambient lighting with ceiling lights, floor lamps, or LED strips to balance the room and reduce eye strain from harsh contrast.
Accent Lighting for Comfort and Visual Appeal
Accent lighting, like LED strips behind your monitor or a decorative lamp, makes the space feel more comfortable and visually interesting without interfering with your work.
How Should I Set Up Lighting for Video Content Creation?
Key Light Placement
Set your leading light, such as a ring light or softbox, at a 45-degree angle to your face, slightly above eye level. This softens harsh overhead shadows and makes you look more natural on camera. A decent ring light costs around $50-150 and lets you easily adjust brightness and colour.
Color Temperature
Pick daylight-balanced lights (5000–6500K) for true-to-life skin tones. Warmer lights (3000–4000K) feel cosy but can make you look orange. Keep your key light’s temperature close to your room lighting to maintain consistent video colours.
Fill Light and Shadows
Add a fill light on the opposite side at about half the brightness of your key light. A simple LED panel for $40-80 works fine. Softening shadows keeps your face from looking flat and adds natural depth.
RELATED: How to Get the Best Lighting for Video Calls: Tips and Recommendations
What Productivity Systems Should I Use in My Home Office?
Physical and digital organization can work together to improve your workflow and here’s how:
Physical Productivity Setup
Set up your desk in zones so everything has a place. Keep your main area, including the keyboard and mouse, clear.
Use one spot for processing incoming tasks and another for reference items you don’t need all the time. This prevents your desk from becoming a messy pile.
Limit distractions with simple boundaries. Face your desk away from busy areas if you share the space. Noise-cancelling headphones or white noise can help block chatter.
Keep your phone and snacks out of reach to avoid impulse checks. Tidy cables and store supplies you rarely use to keep your workspace calm and focused.
Digital Workflow Integration
Arrange your digital tools to follow your workflow. Open your email in the same spot every morning, keep your calendar nearby, and keep your project management tool close. Doing this consistently builds muscle memory and makes decisions easier.
Tools like Notion, ClickUp, or Asana for project management, paired with a pinned Google Calendar tab or Outlook Calendar sidebar, create this spatial consistency.
The specific tools matter less than using them in the same digital location every time—left monitor for reference materials, right monitor for active work, or dedicated browser windows for specific tasks.
Manage your screens so you don’t waste time switching windows. If you have two monitors, dedicate one to reference material and the other to active work.
If you only have one, use virtual desktops on Windows or Spaces on Mac to separate email and chat from focused work.
Automate repetitive tasks whenever possible. Use text expanders for common phrases, keyboard shortcuts to open apps quickly, and cloud syncing to keep files accessible across devices. Small automations add up over time and make your day run smoother.
What Common Home Office Setup Mistakes Should I Avoid?
1. Overcrowding Your Desk with Every Possible Tool
Crowding your desk with every tool you own only slows you down and creates visual chaos. Keep just the items you use daily within reach, usually two pens or pencils, and tuck the rest in drawers or storage.
2. Choosing Aesthetic Over Function
A desk that looks good on Instagram but forces you to hunt for supplies constantly doesn’t help your workflow. Select furniture that supports your tasks first, then add items that also look nice.
3. Poor Cable Management
Tangled cords frustrate you every time you plug or unplug something and make your space look messy on video calls. Spend half an hour setting up cables with velcro ties, clips, or sleeves, and you’ll save time and hassle every day.
RELATED: 9 Common Home Office Setup Mistakes and How to Fix Them
What Are the Best Home Office Setups for Different Work Styles?
Different work styles demand different configurations. Your setup should match how you actually work, not how you think you should work.
Minimalist Home Office Setup
Stick to the essentials. Mount a folding desk on the wall, grab a compact chair, and use a laptop. Keep a wireless keyboard and mouse to cut down on clutter, and stick to a single monitor so you don’t get distracted.
Writers, consultants, or anyone whose work lives entirely on a computer will find this setup works perfectly. Store extra supplies out of sight to keep the space clean.
Creator-Focused Home Office Setup
Set up your space so all your gear is easy to reach. An L-shaped desk gives you room for editing and staging equipment. Put dual monitors side by side to manage timelines and previews.
Mount your microphone on a boom arm and your camera on a tripod or pole so they’re ready without taking up desk space.
Add acoustic panels, moving blankets, or DIY solutions to cut echo and control low-end rumble. Keep your lights in place and match your ambient lighting so colors stay consistent on camera.
Hybrid Remote Work Setup
Balance video call professionalism with comfortable work. Keep your background tidy. Mount a ring light or LED panel and position your webcam at eye level using a monitor stand or laptop riser.
Use a USB speakerphone for clear audio or a comfortable headset for long calls. Test your setup before important meetings so you avoid tech headaches.
How Much Does a Home Office Setup Cost?
The budget sets the starting point, but any amount can create a functional workspace when spent strategically.
Budget Home Office Setup
Total Investment: $200-500
Start with absolute essentials and upgrade over time.
Furniture:
- Basic desk (Ikea/used furniture stores): $50-100
- Used office chair (Facebook Marketplace/thrift stores): $50-80. When buying used, test all adjustments in person (height, tilt, armrests), check for visible fabric tears or permanent stains, and sit in the chair for 2-3 minutes to confirm the gas cylinder holds height without slowly sinking.
Avoid chairs with broken mechanisms or missing parts, as replacement components often cost more than buying a working used chair.
Equipment:
- Display option (under $200 budget): Use existing laptop screen: $0
- Display option ($400-500 budget): Refurbished 24″ monitor: $100-150
- Basic wired keyboard and mouse (combined): $15-30
Lighting:
- Desk lamp (Target/Amazon): $20-30
- Natural light optimization (window positioning): $0
Optional Future Addition:
- Desktop standing converter: $100-150
Estimated Total Range: $200-500
Strategy Notes: Technology doesn’t need to be new to be functional. A three-year-old monitor displays text perfectly fine.
Wireless and ergonomic peripherals can wait until you upgrade. Skip the standing desk initially because you can add a desktop converter later.
Mid-Range Home Office Setup
Total Investment: $1,200-2,000
This range delivers comfort and functionality without premium pricing. These aren’t Herman Miller quality, but they’re leagues better than budget furniture and provide years of reliable service.
Furniture:
- Electric standing desk (Uplift/Flexispot): $400-600
- Ergonomic chair (Autonomous/Sihoo): $200-350
Equipment:
- Dual 24″ monitors: $300-400
- Monitor arms (dual): $150-200
- USB-C docking station: $100-150
- Quality keyboard and mouse (combined): $100-150
- 1080p webcam upgrade: $80-120
- USB microphone for calls: $80-120
Lighting:
- LED desk lamp (colour temperature adjustable): $50-80
- Bias lighting (behind monitors): $20
Estimated Total Range: $1,200-2,000
Quality Level: Mid-range equipment provides substantial comfort improvements and professional-grade functionality for most work scenarios.
Premium Home Office Setup
Total InvestmentInvestment: $4,000-6,000+
Maximise comfort, quality, and longevity. These investments are distributed over the years of daily use.
Furniture:
- Herman Miller Aeron or Steelcase Leap chair (new): $1,200-1,600
- Herman Miller Aeron or Steelcase Leap chair (refurbished): $500-800
- Fully Jarvis or Uplift standing desk (solid wood top): $800-1,200
Display & Connectivity:
- Dell UltraSharp or LG UltraFine 27″ 4K monitors (each): $500-700
- Ergotron monitor arms (per arm): $150-200
- Thunderbolt dock (10+ ports): $300-400
Creator Equipment Upgrades:
- Sony or Panasonic mirrorless camera: $1,000-1,500
- XLR microphone setup with audio interface: $400-600
- Professional lighting kit: $300-500
- Cable management, acoustic treatment, premium peripherals: $500-800
Estimated Total Range: $4,000-6,000+
Longevity Notes: Herman Miller and Steelcase chairs last 10+ years with unmatched ergonomic support—backed by 12-year manufacturer warranties (vs. 1-3 years for budget chairs).
A $1,200 Aeron used for 15 years costs $80/year, while a $300 chair replaced every 3 years costs $100/year.
The premium chair actually delivers better value over its lifespan while providing superior ergonomic support throughout.
Premium monitors provide colour accuracy and eye comfort for extended use. Professional creator equipment produces broadcast-quality output.
Home Office Setup Checklist
Furniture Checklist
- Desk (appropriate size for equipment needs)
- Ergonomic chair with lumbar support and adjustability
- Standing desk converter or full electric desk (optional but beneficial)
- Storage solutions (drawers, shelves, filing cabinet)
- A footrest is needed for proper ergonomics
Equipment Checklist
- A computer with adequate specifications for the workload
- External monitor(s) sized appropriately for tasks
- Keyboard and mouse (ergonomic options reduce strain)
- Webcam (if the built-in camera is insufficient)
- Microphone or headset for calls
- Surge protector with adequate outlets
- Cable management accessories
- Backup power supply if work is mission-critical
Lighting Checklist
- Desk lamp with adjustable brightness
- Ambient lighting to reduce eye strain
- Window treatments for glare control
- Ring light or key light if recording video
- Colour-temperature-adjustable lights for the circadian rhythm
Productivity Checklist
- Organized desk zones for different task types
- Digital organization system established
- Noise management solution (headphones, white noise)
- Visual distractions minimized
- Workflow automation tools configured
READ MORE: Home Office Setup Checklist: 11 Essentials for 2026
Home Office Setup Frequently Asked Questions
How do I set up a home office in a small space?
Use vertical storage like floating shelves and wall-mounted organizers. Pick a compact corner desk or a wall-mounted fold-down desk to save floor space. Go for multifunctional furniture, like storage ottomans or desks with built-in drawers.
Keep only the things you use every day on your desk, and put the rest away. Make sure cables are neatly managed—clutter shows immediately in small spaces.
What’s the most important ergonomic investment?
Your chair. You’re sitting 8–10 hours a day, and bad posture adds up, causing back pain over time.
A good ergonomic chair with lumbar support, adjustable height, and proper seat depth keeps your back safe. A chair that costs $300–$500 might seem pricey, but it stops injuries that would cost way more later.
Do I really need a standing desk?
Not really, but they help. Switching between sitting and standing boosts productivity by about 45% and cuts lower back pain by 80% compared to sitting all day.
You don’t need to stand constantly—just alternate throughout the day. If money’s tight, start with a desktop converter ($100–$150) before buying a full electric desk.
How much should I budget for a home office?
Functional setups can start at $200–$500. If you want comfort and improved ergonomics, expect to pay $1,200–$2,000. For creators or high-end setups, it can cost $4,000–$6,000 or more.
Base your budget on your work: basic computer tasks need less, and content creation needs more. Get the essentials first—desk, chair, lighting—and upgrade over time.
Use vertical storage like floating shelves and wall-mounted organizers. Pick a compact corner desk or a wall-mounted fold-down desk to save floor space. Go for multifunctional furniture, like storage ottomans or desks with built-in drawers.
Keep only the things you use every day on your desk, and put the rest away. Make sure cables are neatly managed—clutter shows immediately in small spaces.
Your chair. You’re sitting 8–10 hours a day, and bad posture adds up, causing back pain over time.
A good ergonomic chair with lumbar support, adjustable height, and proper seat depth keeps your back safe. A chair that costs $300–$500 might seem pricey, but it stops injuries that would cost way more later.
Not really, but they help. Switching between sitting and standing boosts productivity by about 45% and cuts lower back pain by 80% compared to sitting all day.
You don’t need to stand constantly—just alternate throughout the day. If money’s tight, start with a desktop converter ($100–$150) before buying a full electric desk.
Functional setups can start at $200–$500. If you want comfort and improved ergonomics, expect to pay $1,200–$2,000. For creators or high-end setups, it can cost $4,000–$6,000 or more.
Base your budget on your work: basic computer tasks need less, and content creation needs more. Get the essentials first—desk, chair, lighting—and upgrade over time.